


Last updated on June 9th, 2020
When the specimens are correctly mounted, their study and identification becomes easier. For this purpose, try to avoid a collection of specimens glued on the mounting cards in their dead position (rolled-up), or glued with too much glue, as well as try to avoid to pin the specimens with large pins that could hide or destroy some characters. Anyway, if you are used to pin the specimens, use the standard insect pins size #00 or #0, that are thinner, and insert them in the lateral-center of the thorax, as you do with wasps and beetles. Or use the micro-pins, also known as ‘minuten pin’, that have a diameter of 0.10mm, 0.15mm, 0.20mm and 0.25mm.
|
No.
|
length
mm |
Ø
mm |
|
000
|
38
|
0.25
|
|
00
|
38
|
0.30
|
|
0
|
38
|
0.35
|
|
1
|
38
|
0.40
|
|
2
|
38
|
0.45
|
|
3
|
38
|
0.50
|
|
4
|
38
|
0.55
|
|
5
|
38
|
0.60
|
|
6
|
38
|
0.65
|
|
7
|
52
|
0.70
|
Alternatively, you can use the traditional mounting cards for entomological use, made in high quality Bristol paper with slightly rounded edges.
We prefer the transparent cards made in transparent acetate, that facilitates the examination of the diagnostic characters of the ventral side.
If you like cards, whether white or transparent, we suggest to you to use a limited set of standard sizes, ie. 15x6mm and 20x8mm, that fit the average body sizes of Chrysidids and provide some uniformity to your specimens collection.
Mounting the specimens
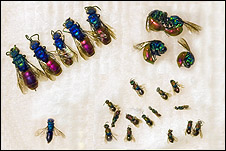
Chrysidids can be handled with soft tweezers, paying attention to the fragile articulations of legs and antennas. A good part for handling them is the chitinic, strong thorax. A thin brush is useful to spread the legs and antennae.
There are some differences between mounting fresh specimens and mounting dried specimens: in the latter case, you need to re-humidify them before mounting.
Mounting fresh specimens
When the specimens are soft – like the freshly collected specimens – you can mount them directly on the entomological cards, using a soft thin brush to spread their legs, wings and antennas. If you have no time to mount them in a short time, you can put your fresh specimens in a vial containing some cotton with few drops of ethyl acetate (to avoid moulds): such method lets you keep your specimens soft for months. If you need to keep them soft for a longer period, you can store your vials in the freezer.
Mounting dried specimens
 If the specimens are dried (dehydrated), or if you need to re-mount them for a given reason, you have to relax them for some hours in a closed jar containing cotton and some water (humidifying chamber), like you do with other dried insects.
For a faster re-humidification of single specimens you can use a syringe to make water enter in their body. First, remove the needle, because you do not need it. Insert the dried specimen in the chamber, fill up the syringe with some water, turn the syringe upwards and press the piston in order to eliminate the air; then, closing the needle-hole with the inch to ensure the vacuum, pull gently the piston: the air contained in the specimen is extracted and replaced by water, forcing the humidification of the specimen. Then you can mount the specimen on the entomological card, if soft enough, or you can set it on a setting board.
Extracting and mounting the internal segments
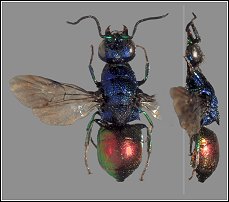
Since the male genitalia have some useful diagnostic characters, it is preferable to extract them from the gaster, but such operation is a little bit advanced. Put the specimen with the belly up and insert a thin pin between the last sternites and the tergites, then extract the packet of the internal segments and place it on an entomological card. Then, under the stereomicroscope, you can glue the packet to the card and carefully spread the segments and the genital capsule using the pins.
Setting on a mounting board
 When you need to set a specimen with care, or because it is not soft enough to be mounted directly on the card, you need a mounting board. A good material for such purposes is the extruded polystyrene in sheets for craft applications, known as Styrofoam™: it lets you easily insert the setting pins (#00, #0) and leave them in position until the specimen is dry.
With the tweezers, set the specimen lying down in ventral position, and then lock it to the board with 2-3 pins intercrossing the thorax. With other pins spread the legs, the head, the antennas and the wings, symmetrically. Legs and wings must be spread not too close to the body, in order to allow the examination of some diagnostic characters.
The specimen will remain for some days on the board, depending on ambient humidity. Recently-collected specimens require a longer time for a complete dehydration, because of their internal soft tissues.
Gluing on the entomological card
 Once dried, the specimen is glued on an entomological mounting card of adequate size and similar to the other cards used for the specimens of the same size. A small drop of glue under the thorax is enough to keep the specimen on the card. The glue must be easy to find/prepare and easy to remove from the specimen through humidification, like an ordinary vinyl glue.
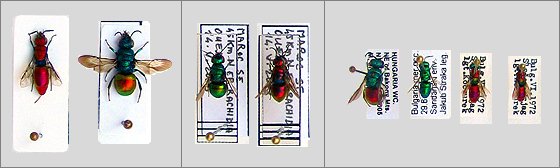
Labelling
To give them a scientific value, the mounted specimens must bear the capture labels, with the following data:
- collection place: Country, State, Region, City, locality, etc.;
- significant geomorphologic element, ie. lakes, forests, rivers, etc.
- coordinates, if known;
- collection date, using an international convention for which the month is in Roman numbers, i.e. 12.XII.2000 (where XII = 12 = December);
- collector’s name, i.e. “leg. C. Darwin” (“leg.” from the latin legit = collected) or “C. Darwin coll.” (“coll” is the abbreviation of “collected”), depending on the Latin or English terminology.
On another label you may add some notes about your field observations, i.e. on Daucus flower.
Try to avoid to use too personal simbols and numerations, because one day your specimens could migrate to other collections or Museums and cryptic labels could become a problem for the other researchers.
Here are some of the abbreviations that is possible to find on identification and locality labels:
| ABBREVIATION | LATIN | MEANING |
|---|---|---|
| aff. | affinis | having affinity with but not identical to; example: Chrysis aff. ignita. |
| auct. | auctorum | of Authors [written like that by various Authors] |
| ca. | circa | about [refers to dates] |
| cf. | confer | compare with; example: Chrysis cf. ignita. |
| et al. | et alii | and others [Authors] |
| ibid. | ibidem | from the same place |
| id. | idem | the same |
| in coll. | in collectionem | in the collection [usually followed by the name of a collection or museum] |
| indet. | indeterminans | unidentified |
| in litt. | in litteris | in correspondence, used for an unpublished datum |
| leg. | legit | collected [followed or preceded by the collector’s name] |
| loc. cit. | loco citato | in the place [work, paper, etc.] cited |
| n.b. | nota bene | take good note |
| s.l. | sensu lato | in a broad sense |
| sp. | species | species [singular; plural is species, abbreviated as spp.] |
| sp. nov. | species nova | new species [singular; plural is species novae, abbreviated as spp. nov.] |
| ssp. | subspecies | subspecies [singular; plural is subspecies, abbreviated sspp.] |
| s. str. | sensu stricto | in the strict sense |
More abbreviations are listed here.
Copyright, Authorship, and Ownership statements
All text and images of this page are copyright ©️ Chrysis.net unless otherwise stated - please see individual cases for authorship and copyright details. The specimens pictured are from the authors' or other collaborators' personal collections and from the collections of various museums. Unless otherwise specified, the whole content of this web site is for personal, non-commercial, scientific, and educational purposes given proper accreditation to the page from which they were derived are provided, and under Chrysis.net Terms and Conditions.
For citation purposes
Agnoli G.L. & Rosa P. (2026) Preparation of Chrysididae, in: Chrysis.net website. Interim version 29 July 2026, URL: https://www.chrysis.net/chrysididae/preparation-of-chrysididae/.